Gnumeric - function writing tutorial
Gnumeric - function writing tutorial
How to write a Gnumeric bespoke user defined function from scratch
Overview
This post will describe the steps needed to create a bespoke user defined function from scratch. It will take the reader from downloading the gnumeric source code, writing the function, compiling and using it. Step by step.
Introduction - why gnumeric?
There are several options for the Linux user when it comes to native spreadsheets. Libreoffice calc, kspread and gnumeric are a few of the more well known. Libreoffice was my initial choice but the function writing proved to be very difficult due to impenetrable documentation and no practical tutorial/examples. Gnumeric on the other hand is written in C with a Gtk interface and most of the code is relatively easy to follow. This compensates for the limited documentation in what is in reality a very robust application that whilst no longer developed, is in a maintained state thanks to the heroic efforts of its maintainers - for which I am grateful.
This guide is intended to kick-start the reader towards writing their own functions. Hopefully, at the end of it the reader will be able to easily build further functions. This is the result of a lot of time spent looking over the code to find clues about how any why things are defined. The reader is advised to build on this tutorial by looking at similar functions and finding out as much as possible. The Gnumeric maintainers can be contacted and appear willing to give hints and tips but always be polite and considerate.
Step 1 - get the source
This guide is based on Debian, but it is easy to apply this to Fedora or other distributions since the only difference will be the software libraries needed in the compilation. If your distribution doesn’t have the needed library, you will be told this when the compilation fails (at the configure phase). Simply seek out the needed library and install from your package repository and try again.
The first step is to download the current source code from the project website, www.gnumeric.org
Look down the list for the latest release and click the link.
As an example http://www.gnumeric.org/announcements/1.12/gnumeric-1.12.55.html
Here you will see that you need to download and compile both the gnumeric code AND the goffice code associated with that build.
Do not be afraid of building the software. This is a regular thing for most Linux users and those who are new to compilation can access a huge online community that will help.
GOFFICE Click the link to the goffice sources and you will be taken to the list e.g. https://download.gnome.org/sources/goffice/0.10/
select the LATEST and download it.
GNUMERIC Click the link to gnumeric sources e.g. https://download.gnome.org/sources/gnumeric/1.12/
select the LATEST and download it.
Step 2 - uncompress the downloaded files
Wherever you have downloaded these files select and uncompress them. In Gnome files, this is “extract”.
Then navigate the the goffice folder you just created, and begin the compilation as the next step.
Step 3 - compilations
It is necessary to compile the associated goffice package which provides the needed interfaces e.g. charts etc.
Navigate to the goffice downloaded directory if you haven’t already and open a terminal window in that directory. Then type the following:
1./configureThe configure command sets up the code for the build process. If there are missing libraries these will be reported and a failure indicated. For any failure you need to seek out the needed software libraries and install them. Usually, these can be found in the synaptic application under Debian. As an example some libraries that typically need to be installed on a fresh Debian distribution are:
1intltool
2build-essential
3libgtk-3-dev
4libgsf-1-dev
5librsvg-dev
6libxslt1-dev
7itstool
8libxml2-utils
9bison
If you cannot find the needed library, try an internet search to see if the library is part of a differently named package. This almost always is the case. So a search will report back on this.
Assuming your ./configure command has run successfully, you can move to the second of three steps; the make command.
Type:
1makeThis will take a little time to run. If successful the code then needs to be installed on your system. You will need root access to do this. If you have sudo setup this is then simply:
1sudo make installYou then need to repeat the above compilation process for the gnumeric code by first going into the downloaded and uncompressed gnumeric folder and typing:
1./configure
2make
3sudo make install
step 4 - final setup to run Gnumeric
At this stage the software is installed but if you attempt to run it nothing happens. If you open a terminal and attempt to run gnumeric from the command line you may get something like this:
1gnumeric: error while loading shared libraries: libspreadsheet-1.12.48.so: cannot open shared object file: No such file or directoryThis is a regular issue when new users attempt to compile Gnumeric and it is not generally clear what to do at this point. Often people give up and reinstall gnumeric from their distribution repositories. This is not needed. What this in fact means is that the shared libraries need to be updated. Once done, it all should work. To do this simply type:
1sudo ldconfig -vHere ldconfig purges and rebuilds the liconfig cache ensuring the libaries are up to date in the cache
At this point you are good to go!
Step 5 - where are the functions?
To find all the functions used in gnumeric you need to navigate to the /plugins directory of the now compiled gnumeric folder. Here functions are grouped by their category. For example financial functions are under the folder fn-financial, math functions under fn-math.
You can access the README file that gives a brief explanation of how to hack your own functions, but here I will detail how to do it.
To keep things organised you should configure your own functions under a similar logic. Here we will create a new function called Density and put it under a directory called fn-thermo (short for thermodynamic or thermochemical) You can call yours whatever you like but keep it logical so you can find it and know what it is later.
Step 6 - a new Density Function
To make things easier we shall take an existing function directory and modify it. So copy the applix directory and rename it fn-thermo
1cp -R applix/ fn-thermo/Here the -R option is a recursive copy and the trailing \ ensures that the operation is done on directories.
Now move to the newly created fn-thermo directory
delete all the .c and .h files
The function definition file is contained within the plugin’s directory and is compiled along with the rest of the code base when the standard ./config make make install commands are used:
functions.c
1#include "numbers.h"
2#include <math.h>
3#include <stdio.h>
4#include <gnumeric-config.h>
5#include <gnumeric.h>
6#include <func.h>
7#include <parse-util.h>
8#include <cell.h>
9#include <gnm-format.h>
10#include <gutils.h>
11#include <sheet.h>
12#include <workbook.h>
13#include <value.h>
14#include <expr.h>
15#include <number-match.h>
16#include <mathfunc.h>
17#include <rangefunc-strings.h>
18#include <collect.h>
19#include <goffice/goffice.h>
20#include <gsf/gsf-utils.h>
21#include <gsf/gsf-msole-utils.h>
22#include <gnm-i18n.h>
23#include <gnm-plugin.h>
24#include <goffice/goffice.h>
25#include <gnm-plugin.h>
26#include <math.h>
27#include <string.h>
28#include <stdlib.h>
29
30
31#define thermo_molarGasConstant GNM_const(8.314472)
32
33GNM_PLUGIN_MODULE_HEADER;
34
35
36#define FUNCTION_A_DESC GNM_FUNC_HELP_DESCRIPTION, F_("Numbers, text and logical values are " \
37 "included in the calculation too. If the cell contains text or " \
38 "the argument evaluates to FALSE, it is counted as value zero (0). " \
39 "If the argument evaluates to TRUE, it is counted as one (1).")
40
41
42
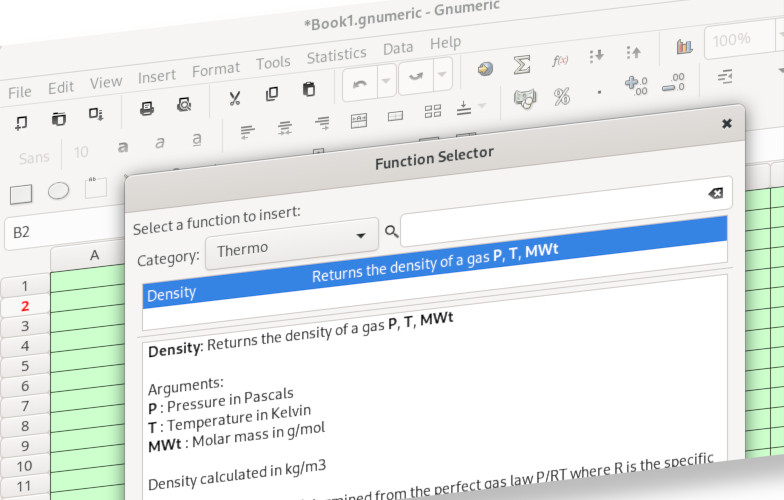
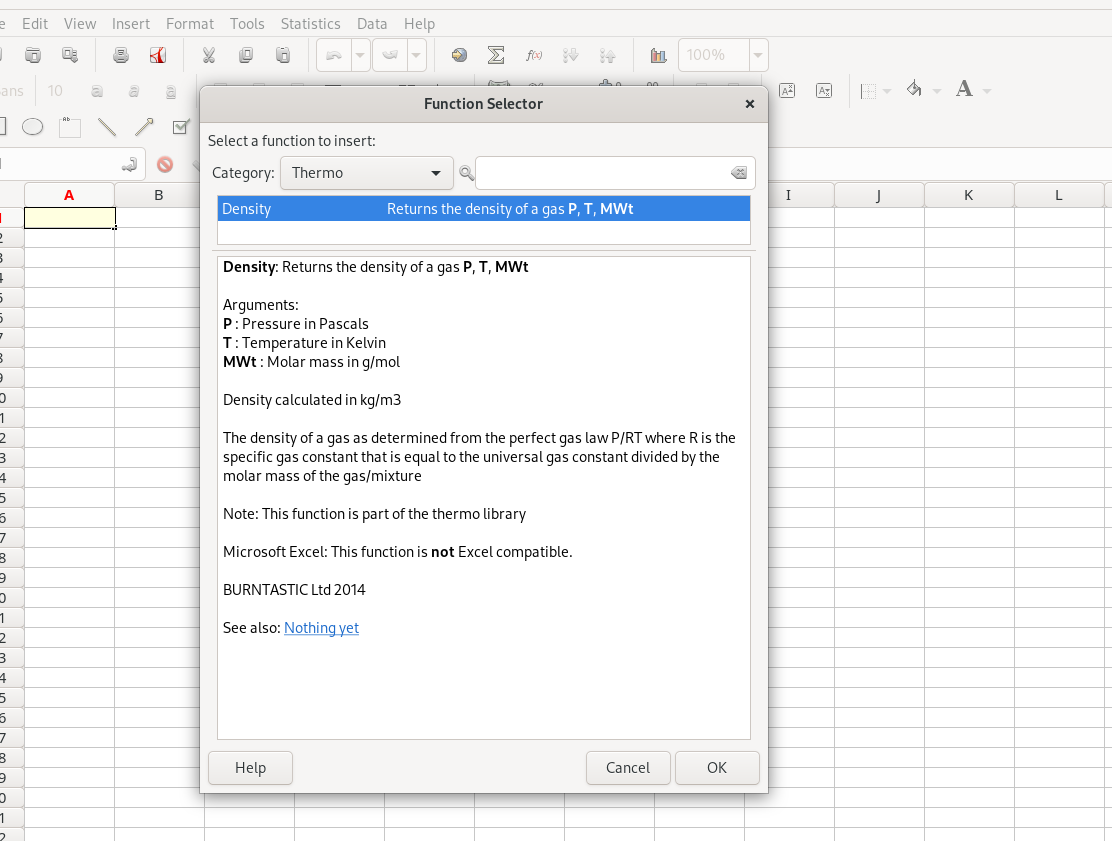
43static GnmFuncHelp const help_Density[] = {
44 { GNM_FUNC_HELP_NAME, F_("Density:Returns the density of a gas @{P}, @{T}, @{MWt}")},
45 { GNM_FUNC_HELP_ARG, F_("P :Pressure in Pascals")},
46 { GNM_FUNC_HELP_ARG, F_("T :Temperature in Kelvin")},
47 { GNM_FUNC_HELP_ARG, F_("MWt :Molar mass in g/mol")},
48 { GNM_FUNC_HELP_DESCRIPTION, F_("Density calculated in kg/m3")},
49 { GNM_FUNC_HELP_DESCRIPTION, F_("The density of a gas as determined from the perfect gas law P/RT where R is the specific gas constant that is equal to the universal gas constant divided by the molar mass of the gas/mixture")},
50 { GNM_FUNC_HELP_NOTE, F_("This function is part of the thermo library")},
51 { GNM_FUNC_HELP_EXCEL, F_("This function is @{not} Excel compatible.") },
52 { GNM_FUNC_HELP_DESCRIPTION, F_("BURNTASTIC Ltd 2014")},
53 { GNM_FUNC_HELP_SEEALSO, "Nothing yet"},
54 { GNM_FUNC_HELP_END}
55};
56
57
58
59static GnmValue *
60gnumeric_Density (GnmFuncEvalInfo *ei, GnmValue const * const *argv)
61{
62 gnm_float P = value_get_as_float (argv[0]);
63 gnm_float T = value_get_as_float (argv[1]);
64 gnm_float M = value_get_as_float (argv[2]);
65
66
67
68 return value_new_float ( P / ( thermo_molarGasConstant/(M/1000.0) * T));
69}
70
71
72GnmFuncDescriptor const thermo_functions[] = {
73 { "Density", "fff", help_Density,
74 gnumeric_Density, NULL,
75 GNM_FUNC_SIMPLE, GNM_FUNC_IMPL_STATUS_UNIQUE_TO_GNUMERIC, GNM_FUNC_TEST_STATUS_NO_TESTSUITE },
76 {NULL}
77};Note in the above code the GNM_FUNC_HELP_NAME provides the ability to edit the help dialogue for the function that pops up in the Function Selector window inside Gnumeric.
The plugin.xml file needs to be added/modified to the new function directory
plugin.xml
 1<?xml version="1.0" encoding="UTF-8"?>
 2<plugin id="Gnumeric_fnthermo">
 3	<information>
 4		<name>Thermo Functions</name>
 5		<description>Thermo functions</description>
 6		<require_explicit_enabling/>
 7	</information>
 8	<loader type="Gnumeric_Builtin:module">
 9		<attribute value="plugin" name="module_file"/>
10	</loader>
11	<services>
12		<service type="function_group" id="thermo">
13			<category>Thermochemical</category>
14			<category xml:lang="en_GB">Thermo</category>
15			<functions textdomain="gnumeric-functions">
16				<function name="Density"/>
17			</functions>
18		</service>
19	</services>
20</plugin>
Makefile.am
 1AM_CPPFLAGS = \
 2    -DGNOMELOCALEDIR=\""$(datadir)/locale"\" 	\
 3    -I$(top_srcdir)/src	-I$(top_builddir)/src	\
 4    $(GNUMERIC_CFLAGS)
 5
 6gnumeric_plugin_fnthermodir = $(gnumeric_plugindir)/fn-thermo
 7xmldir = $(gnumeric_plugin_fnthermodir)
 8gnumeric_plugin_fnthermo_LTLIBRARIES = plugin.la
 9plugin_la_LDFLAGS = -module $(GNUMERIC_PLUGIN_LDFLAGS)
10plugin_la_SOURCES = functions.c
11
12
13xml_in_files = plugin.xml.in
14xml_DATA = $(xml_in_files:.xml.in=.xml)
15
16@INTLTOOL_XML_RULE@
17
18EXTRA_DIST = $(xml_in_files)
19CLEANFILES = $(xml_DATA)
Note that in the Makefile.am above, the references to the fn-therm and functions.c need to be added to any copied file. Otherwise compilation will fail.
Now the new code can be built into the compilation configuration via:
1autoconfIt is then possible to follow the standard compilation commands which are:
1./configure
2make
3sudo make install
Lastly, though maybe not strictly necessary, the libraries can be updated:
1sudo ldconfig -vThe result can be seen in the screen captures below.
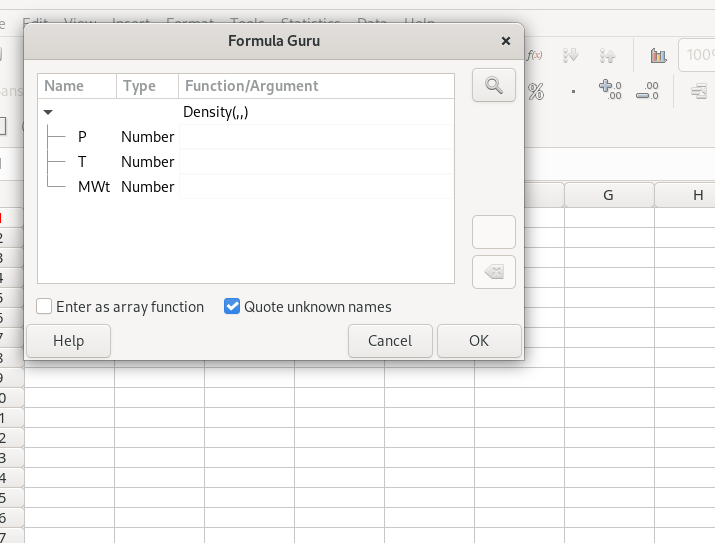
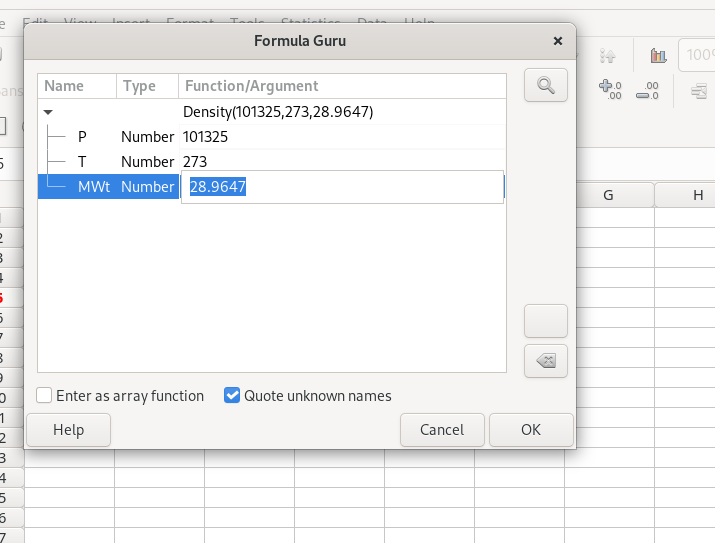
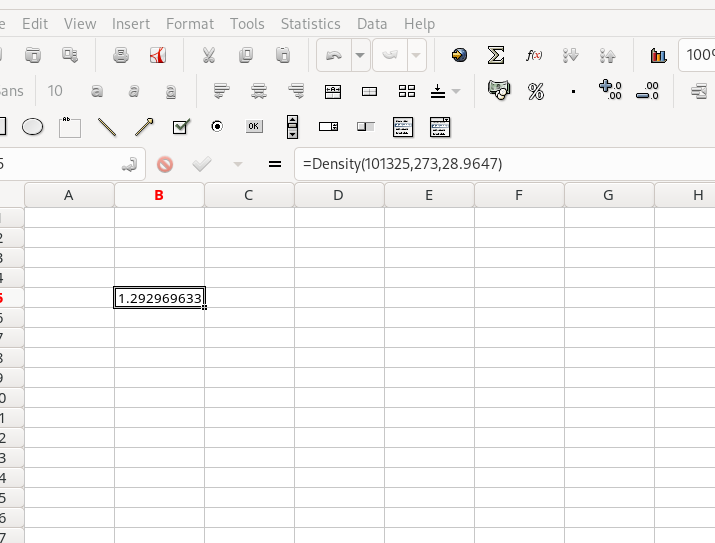
As can be seen the computed density at 273K and 101326Pa for air (molecular weight 28.9647) is 1.29296963 kg/m3. This is the correct value.
Summary
A new function library and a new function Density, has been added to Gnumeric.
The new function library and function are now “hard coded” into the application and therefore are available to anyone who has the code compiled on their system. But because this function has been added and compiled it cannot be altered inadvertently by a user and therefore some element of quality control is maintained.
Further functions can now be added to the fn-thermo library by adding code to the function.c file and the plugin.xml files within the fn-thermo directory.
Although the process is a little convoluted, it is a very common compilation procedure used for Linux software and thus by taking the time to do this the reader has acquired hands-on experience in code compilation that can be applied to other software downloads in the future.
One downside to this is that the actual code used is not visible to the end user. For basic functions such as this one it is not a significant problem. However, for the use of empirical correlations where the correlation has limits these may not be apparent to the regular user and can lead to major issues if used in any component design. It is therefore not recommended that critical calculations are done using spreadsheets rather python and pandas are increasingly moving into this space. I will outline how this is done via literate programming in another blog post.
Comments
If you found this tutorial helpful or have questions arrising from it, you can contact me via the contact page on this website.
Latest Posts
Gnumeric - function writing tutorial
11 Apr 2023
OpenFoam - Micro Combustor
09 Apr 2023